Wednesday, March 30, 2016

Lemon Rosemary Chicken with Sweet Potatoes


This is a knock-out dinner!  It's full of flavor, so easy to make, and filled with great carbs and protein. When I took it out of the oven and added the fresh rosemary on top I felt like I was making something I'd be served at a restaurant and that feels pretty good.  You can probably substitute the fresh rosemary for dried, but I love color and the eye candy and the fresh smell that fresh rosemary brings to a platter.  I hope you enjoy this recipe!


Lemon Rosemary Chicken with Sweet Potatoes
Yield: 4 servings

Ingredients
4 boneless, skinless chicken breasts
2 tablespoons chopped fresh rosemary
2 lemons, 1 sliced and 1 zested and juiced
3 tablespoons olive oil, divided
3 garlic cloves, minced
1 teaspoon kosher salt
1/2 teaspoon pepper
2 medium sweet potatoes, peeled and cubed

Directions
For the marinade: whisk rosemary, lemon juice, lemon zest, 2 tablespoons olive oil, garlic, salt and pepper in a mixing bowl then pour into a large zip-lock bag.  Add chicken breasts and marinade at room temperature for 30 minutes, turning bag once or twice.

Preheat oven to 425 degrees.  Spray a 9x13 pan with nonstick cooking spray.  Set aside.

In a large skillet heat 1 tablespoon olive oil over medium-high heat.  Add sweet potatoes and cook for 5 minutes or until the potatoes start to become tender.  Stir frequently to avoid burning.  Remove from heat.

Arrange chicken breasts and lemon slices evenly in the 9x13 pan.  Add cooked sweet potatoes to the chicken.  Drizzle some of the remaining marinade over the chicken and sweet potatoes.  Bake uncovered for about 40-45 minutes, or until chicken and potatoes are fully cooked.

Recipe Source: yummyaddiction.com


Monday, March 28, 2016

No-Bake Chocolate Peanut Butter Bars


I've noticed that almost every day around 11:30am I need that pick-me-up treat.  Do you know what I'm talking about?  When you need that little handful of some kind of sweet goodness to help reward you for the non-stop morning you've had and to help boost you into the afternoon craziness that will occur?   Well, even if you don't experience that on a daily basis... these no-bake chocolate peanut butter bars are still the perfect little "I need to reward myself with just a little something" treat.  Now let me give a little warning: These bars are addictive and not for the peanut butter weaklings.  These are creamy and wonderful and filled with a lot of the perfect combo: Chocolate and Peanut Butter.  Oh, they're good.  


No-Bake Chocolate Peanut Butter Bars
Yield: Makes one 9x13 pan (so depends on how big you cut your bars)

Ingredients
1 cup unsalted butter, melted
2 cups graham cracker crumbs
2 cups powdered sugar
2 cups creamy peanut butter, divided
1/2 teaspoon salt
2 cups semisweet chocolate chips
1 1/2 cups rice crispy cereal

Directions
Spray a 9x13 pan with non-stick cooking spray.  Set aside.

In a mixing bowl beat together the melted butter, graham cracker crumbs, powdered sugar, 1 cup peanut butter and salt.  Spread into the prepared pan.  Refrigerate at least 15 minutes to firm up a little.

In a microwave safe bowl melt together the chocolate chips and remaining 1 cup peanut butter in the microwave for 30 second intervals, stirring in between each interval until smooth.  Once all is melted and smooth stir in the cereal.  Spread on top of the chilled peanut butter layer.  Refrigerate until chocolate is firm before serving.  Store in an airtight container in the refrigerator.

*These can soften pretty good if left out of the refrigerator for too long.  I like them on the firmer side so I prefer to keep them chilled.
*This also cuts in half nicely for an 8x8 pan.


Recipe Source: TheGirlWhoAteEverything.com

Friday, March 25, 2016

Sweet Cornbread - and Creamy Honey Butter


This cornbread is perfect alongside a bowl of soup or EVEN all. by. itself!  It is so yummy that when my oldest son gets home from school he wants it as his snack.  It's almost like a cake, but not that sweet, but yes - that good.  And then top it with this yummy and super-easy-to-make honey butter and you've got yourself a keeper.  I thought with all the soup recipes I've been sharing I should share one of our favorite go-to bread recipes when we have soup.  I hope you love it as much as we do! 


Sweet Cornbread
Yield: 9 servings

Ingredients
Cornbread:
1/2 cup cornmeal
*1 1/2 cups all-purpose flour
*2/3 cup granulated sugar
1 tablespoon baking powder
1/2 teaspoon salt
1/3 cup oil
3 tablespoons butter, melted
2 eggs, beaten
1 1/4 cup milk
Honey Butter:
1 stick butter, softened
1/4 cup honey
1/4 cup marshmallow fluff

Directions
For the cornbread:
Heat oven to 350 degrees.  Spray an 8-inch pan with non-stick cooking spray and set aside.
Add dry ingredients into a medium sized mixing bowl.  Make a well in the center and add oil, butter, eggs, and milk.  Stir until just mixed (batter will be runny).  Pour into prepared baking pan and bake in pre-heated oven for 35 minutes or until toothpick inserted into the center comes out clean.

For the Honey Butter:
Whip all ingredients together with an electric mixer  until well combined.  Serve at room temperature.  You can store any leftovers in the refrigerator and then soften it up a little when you'd like to use it again.

*You can substitute some of the all-purpose flour for whole-wheat flour if you'd like.  I like to do half all-purpose and half whole-wheat flour a lot of the time when I make this.
*You can also decrease the sugar amount by almost half if you'd like.  The cornbread still turns out very sweet and delicious.

Recipe Source: melskitchencafe.com

Wednesday, March 23, 2016

Chocolate Peanut Butter No-Bake Energy Bites


I'm always on the look out for healthier snack options for my family.  Yes, the Oreo's still find their way into my pantry, who am I kidding?  But I'm trying my best (one step at a time) to feed my family healthier.  Now there are a lot of different "No-Bake Energy Bite" recipes out there and I've tried a handful of them, but my favorite so far is this one.  It has to be the combination of the cocoa powder and peanut butter that seal the deal for me.  I like the ones with chocolate chips, but I never have mini chocolate chips on hand and the regular sized chocolate chips are just too big in my opinion.  In this recipe, the smoothness of the cocoa powder and peanut butter make me happy and at the same time I love the added texture of the oatmeal and seeds.  It makes my mama heart a little happier when I see my kids reach in the fridge and grab one of these as an after-school and/or bed-time treat.  In my head I'm silently saying, "YES!"  


Chocolate Peanut Butter No-Bake Energy Bites
Yield: Makes about 20-25 balls

Ingredients
1/2 cup peanut butter
1/3 cup honey or agave nectar
1 teaspoon vanilla extract
1 cup oatmeal, raw
1/4 cup unsweetened cocoa powder
2/3 cup coconut flakes, toasted and cooled (sweetened or unsweetened)
1/2 cup ground flaxseed
1 tablespoon chia seeds, optional

Directions
In a mixing bowl. stir together peanut butter, honey and vanilla extract.  Add remaining ingredients and stir until well combined and evenly coated.  Cover mixture and chill in the refrigerator for at least half an hour, to make the mix easier to handle and mold.

Once chilled, roll into 1-inch balls (or whatever size you would like).  Store in an airtight container and keep refrigerated for up to 1 week.

Recipe Source: Marsha Peterson, a friend of mine from church.

Monday, March 21, 2016

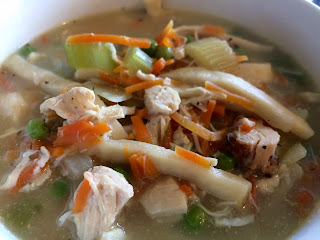
Homemade Chicken Noodle Soup - The Best.


A few years ago - ok, maybe almost like 10! - my sister Karen introduced this recipe to me.  I've been making it regularly ever since.  I've tried multiple homemade Chicken Noodle Soup recipes, but I always come back to this one.  Karen told me how every Halloween night she makes a few different kinds of soups and leaves them on the stove with some bread on the side so throughout the night her busy kids can come and choose their soup whenever they have time amongst their other busy Halloween plans.  I loved the soup and bread idea on Halloween night so we've adopted it, too.  Thanks Karen!

This recipe is easy and super delicious.  It's another one of Colby's regularly requested dinners when I ask him to help me with my meal planning.  I'm pretty sure it's the noodles that make this recipe irresistible.  I also think it tastes better if the chicken is seasoned a little.  I've done plain boiled chicken and it just doesn't pass the test as well as chicken I've cooked in the crockpot with salt and pepper and chicken stock, or leftover rotisserie chicken like Karen suggested.  We've also made this with leftover turkey and turkey stock from Thanksgiving or whenever Colby has smoked a turkey and it's still way good.

I'm sure any kind of frozen egg noodle would work but these are perfect!  You only use 1/2 of the 24oz bag, so save the other half for the next time you make this soup!

 Seasoned chicken or leftover Rotisserie chicken adds great flavor.

Those rolls in the background can't wait to be dipped in the broth.  Don't you worry little rolls, I will dip you.  And the other ones I will spread butter on you and eat you with a smile on my face.


Homemade Chicken Noodle Soup - The Best.
Yield: 6 servings

Ingredients
1 bag of sliced carrots
1 stalk of celery, diced
1 onion, diced
2 quarts water
4 chicken bouillon cubes
3 chicken breasts, cooked and diced or shredded
1 can cream of chicken soup
1 teaspoon basil
1 cup frozen peas
12 oz Reames Homestyle Egg Noodles (they're in the frozen section)

Directions
In a large pot over medium-high heat boil vegetables, water and bouillon cubes for 20 minutes.  Add cooked chicken, cream of chicken soup, basil and peas.  Bring everything to a boil then add Reames frozen noodles and cook an additional 5 minutes.  Serve warm with warm rolls.  Soooo good.

Recipe Source: my sister, Karen Wilkinson


Thursday, March 17, 2016

Mint Chocolate Chip Ice Cream Pie


Happy St. Patrick's Day!  I know I'm giving this to you the day of St. Patrick's Day, but if you are still in need of a fun St. Patrick's Day dessert for tonight this one is too easy and tastes just like Girl Scout Thin Mint cookies.  It's delicious.

Now normally Mint Chocolate Chip Ice Cream is green, right?  I bought my ice cream at Aldi's and for some reason it's not very green at all.  Don't let that deceive you though because it's still as minty delicious as ever.  If you're making this for St. Patrick's Day though you probably want to make sure the ice-cream is green.

This recipe has two ingredients, just needs an hour or so in the freezer to set and you are good to go.  By the time you get home from the store your ice cream will probably be softened enough to go right ahead and whip up this pie.  It's really so simple.  I mean - two ingredients... you can't get much easier than that!  My kid's loved this dessert.  I have a feeling we'll be making this again soon.


Mint Chocolate Chip Ice Cream Pie
Yield: 8 servings

Ingredients
1.5 quarts green Mint Chocolate chip ice-cream
1 pre-made Oreo cookie crust
Whipped cream, optional
Chocolate shavings, optional

Directions
1. Put ice cream in the container on the counter to soften a little.  When it's softened, put the ice cream in a mixing bowl and stir until it's a soft serve consistence.  Spread evenly in the Oreo crust.  Try not to overfill the crust.
2. Put it into the freezer to get firm for at least an hour.
3. Remove pie from the freezer and decorate with whipped cream and grated chocolate if desired.

Recipe Source: barbarabakes.com


Wednesday, March 16, 2016

Oatmeal Make-Ahead Pancake Mix


A few weeks ago I mentioned how I make pancakes about 5 times a week.  That's no exaggeration.  I'd think my kid's would get sick of pancakes, but they don't!  These are the pancakes my daughter lives for.  Last night in her bedtime prayers she prayed that I would "make the good pancakes again".  I had been trying a different recipe for a few days and I think she was done with that.  Her prayers were answered and this morning these pancakes appeared on her plate.

I love make-ahead mixes because I can make the mix during an afternoon when I don't have much going on so all I have to do is add a few ingredients the morning of and wah-lah: yummy, homemade pancakes to help with those crazy morning rushes.

These pancakes are fluffy and filling.  My husband says 10 times out of 10 he would take this pancake recipe over any iHop pancake any day of the week.  Wow.  You want to give this girl a compliment?  Say that.  Made. my. day.


So fluffy - I love them.


Oatmeal Make-Ahead Pancake Mix
Yield: About 20 cups of dry mix

*Update: The last couple of weeks my pancakes have been clumpier than usual.  There have been a few times when I've bitten into a little ball of mix and that's not very appealing.  I've realized that sometimes I'm adding too much oil.  So I decreased the oil just a little (probably less than 1/8 cup or right around) and they are turning out perfect.  If you're experiencing any clumps maybe give this a try.  Not sure if this picture depicts it, but it's softer and fluffier with less oil.


Ingredients
7 cups rolled (quick) oats
10 cups whole wheat flour
5 tablespoons sugar
6 tablespoons baking powder
2 tablespoon salt
2 tablespoon baking soda
2 cups canola or vegetable oil

Directions
Grind the oats in a blender or food processor.  (If you want to have a little more texture to your pancakes you can leave some of the oats whole.  My kids prefer smooth pancakes so I blend them pretty well in my Vitamix and it comes out to a perfect powder.)  Then add all the dry ingredients together in a large bowl and mix together with a wooden spoon until all is combined.  Gradually drizzle the oil into the bowl.  I do one cup at a time.  After the first cup of oil I stir it with my spoon but once I add the second cup of oil I mix it together with my hands.  You'll know it's all mixed together just right when you squeeze a clump of mix in your hand and it stays together.  If it's still crumbly, add another tablespoon of oil at a time.  (I've never had to add more oil.)  Store in an airtight container indefinitely in the refrigerator.

To make the pancakes: whisk together 2 cups of mix, 1/2 cup plain greek yogurt, 1 1/4 cups milk and 2 eggs.  The mixture seems thin at first but the oats will soak up the milk as it sits.  I let it sit for anywhere between 10 minutes to an hour (depending on how far in advanced I make this).  If it gets too thick I add a little more milk.  Heat a griddle and drop the batter onto it.  When the edges look dry and bubbles come to the surface and don't break, turn the pancake over to finish cooking on the other side.  This usually makes 12, 5-inch pancakes.

*If you like thicker pancakes you can do more yogurt or less milk and if you like thinner pancakes up the milk or reduce the yogurt.  I make my own Kefir so now I actually do 1 cup Kefir to 1 cup milk and they turn out even fluffier!  You can also substitute the plain yogurt for buttermilk.  As you can tell - you can play around with the ingredient amounts to your liking.

This is the container I love to store this mix in, in the refrigerator.  I bought a few of them at Walmart for $2 or $3 a container.  I use these containers to store a lot of things in my pantry, too - nuts, baking items, chocolate chips,...


Source:  adapted slightly from melskitchencafe.com

Monday, March 14, 2016

Sesame-Pineapple Chicken Stir-Fry


This dinner was so quick to put together and even more delicious to eat and not to mention... pretty gosh darn healthy in my book.  I love all the colors, too!  If you're in need of a quick, easy, yummy, healthy meal I invite you to give this one a try.  It's made a home in the Park recipe cookbook.


Sesame-Pineapple Chicken Stir-Fry
Yield: 4 servings

Ingredients
1 tablespoon oil
1 lb. boneless skinless chicken breast, cut into bite-size pieces
2 cups sugar snap peas, trimmed
1 large red bell pepper, cut into 1-inch pieces
3 cloves garlic, minced
2 cups fresh pineapple chunks, cut into 1-inch pieces
1/4 cup Asian Toasted Sesame Dressing
1 tablespoon lite soy sauce

Directions
Heat oil in a large skillet on medium-high heat.  Add chicken, peas, peppers and garlic; stir-fry 8 to 10 minutes or until chicken is done.  Add pineapple; stir-fry 2 minutes or until heated through.  Combine dressing and soy sauce and add to skillet.  Remove from heat and serve over hot rice.

Recipe Source: adapted slightly from kraft

Friday, March 11, 2016

One-Hour Dinner Rolls


Who doesn't love a soft, fluffy, delicious, warm dinner roll?  My family sure does.  Sometimes we pack rolls in my purse as snacks!  Making bread can sometimes be time consuming and you don't remember that you've forgotten to make the dinner rolls until one or two hours before you need them.  That's why this recipe is so magical.  These rolls come together fast and so beautiful.  My 18-month-old gets excited when he sees them baking in the oven.  This is also a great starter recipe if working with yeast intimidates you.  (I know it did me for years.)   

So many times I've made these rolls on Sunday mornings before heading out the door to church.  Yes, even amidst the craziness of Sunday morning these rolls are still doable.  Jump in the shower while they're rising, blow dry your hair while they're baking and enjoy one on the way out the door before indulging on the rest of them the moment you walk back in the door.

I hope you try these and love them!  They've for sure become my go-to roll recipe.  They even make a wonderful gift to a friend - just because you want them to know how grateful you are for them in your life.  (The friend, not the rolls - although I am definitely grateful these rolls are in my life.)

This dough is so soft.  I love it.


One-Hour Dinner Rolls
Yield: 15 rolls

Ingredients
4 cups all-purpose flour (give or take a little)
1/4 cup granulated sugar
3/4 tablespoon instant yeast
1 1/2 teaspoon salt
3/4 cup cool water
2/3 cup milk
4 tablespoons unsalted butter, diced into 5 or 6 pieces
1 1/2 teaspoons lemon juice

Directions
1. Preheat oven to 180 degrees. In the bowl of an electric stand mixer mix together 4 cups flour, sugar, yeast and salt.

2. In a medium bowl add water, milk and butter and heat in microwave on high for 1 minute 30 seconds.  You want to make sure the butter has softened through - not melted all the way.

3. Pour milk mixture into dry mixture in bowl of electric mixer along with the lemon juice.  Start the mixer on low speed to combine all ingredients then gradually increase the speed.  Knead about 3-4 minutes until smooth and elastic while adding additional flour if necessary (dough should be lightly sticky but manageable).

4. Cover bowl tightly with plastic wrap or lid and allow to rest for 5 minutes.  Meanwhile coat a 9x13 baking dish with non-stick cooking spray.

5. Drop dough onto a lightly greased surface.  Shape into an evenly level square, about 9x9-inches.  This dough is so soft you don't even need a rolling pin.  Cut into 16 equal portions (don't have to be exact).  Shape dough into 15 balls, while using excess dough from the 16th portion to add to smaller rounds as needed.  If you like bigger rolls you can make less rounds, if you like smaller rolls you can make more rounds.  15 rolls for us has turned out perfect every time.  Place shaped dough portions into prepared baking dish.

6. Dampen hands with water and brush tops of dough with the water (just so they don't dry while rising in the oven).  Transfer to oven, close oven and turn oven off.  Allow rolls to rise for 20 minutes (do not open oven door).  Remove from oven and preheat oven to 375 degrees (this should take about 5 minutes so just allow rolls to rest on counter while oven is preheating).

7. Bake in preheated oven 14-16 minutes until tops are golden brown.  Remove from oven and if you'd like, you can run the top of a stick of butter over the tops.  Serve warm.  Store in an airtight container.  Rewarming the leftover rolls is wonderful.

Recipe source: Adapted slightly from cookingclassy.com


Wednesday, March 9, 2016

Ravioli with Arugula, Tomatoes and Pancetta


Colby is the master mind behind this recipe being added to our family.  While we were living in Italy he was flipping through TV channels and came across Food Network. Giada was making this ravioli.  He wrote down all the ingredients and the directions, gave me the list of things to buy and when I brought it all home he made it.  I love to make food for my family but every once in awhile it is sooooooo nice when Colby jumps in and says, "I've got this tonight."  (Usually that means we're having mac and cheese, but not this time!)  Not only was I so happy that he was making dinner, but I was so happy that this recipe was incredibly delicious and looked easy to put together.

Now every time this is on the menu Colby will usually step in during some part of the process and start to take over.  I need to get him to watch Food Network more often.

A few things about Pancetta...
1. I had never used Pancetta before this recipe.  It's kind of like bacon.  I normally find it by all the lunchmeat, but I've only had luck finding it at larger grocery store chains, not Aldi or Walmart. 
2. The Pancetta can go from being done to burnt in a heartbeat so watch it carefully and remove it right when it's getting close to being crisp.  Burnt pancetta isn't very fun.  We've had a couple of times when every room in our house smells like Pancetta because I let it go too long and it burned and smoke was bellowing through our house.  Oops.


 I love the colors, and the combination of all the ingredients is just so good.


Ravioli with Arugula, Tomatoes and Pancetta
Yield: 4-6 servings

Ingredients
1 pound cheese ravioli
6 oz thinly sliced pancetta, chopped
1 (15oz) can diced tomatoes, drained
3 tablespoons olive oil
1/2 teaspoon salt, plus extra for seasoning
1/4 teaspoon pepper, plus extra for seasoning
3 cups arugula
3 tablespoons dried basil
2 tablespoons butter, room temperature

Directions
Bring a large pot of lightly salted water to a boil over high heat.  Add the ravioli and cook for 7 to 9 minutes until tender.  (I like to add a little oil to my water to prevent sticking.) Drain and set aside.

While the ravioli is cooking, in a large non-stick skillet over medium-high heat, add the pancetta and cook stirring frequently, until crispy, about 8 minutes.  Remove to a paper towel and let drain.

Add the tomatoes, olive oil, 1/2 teaspoon salt and 1/4 teaspoon pepper and cook for 2 minutes until tender.  Add the arugula and basil and cook until wilted, about 30 seconds.  Stir in the butter and melt.  Add the cooked ravioli and cooked pancetta and toss until coated.  Season with salt and pepper to taste.  Serve warm.

Source: Giada de Laurentiis from www.foodnetwork.com - she uses fresh basil, but I don't always have that on hand.  If you do use fresh then use 1/2 cup thinly sliced fresh basil leaves.

Monday, March 7, 2016

PAZOOKIE Cookie Cups


We are a cookie-loving-family so when I came across this recipe I got so excited!  Sometimes cookies can take a long time to bake, right?  Waiting for all the batches to be done can be pretty time consuming.  But when you want a cookie, you want a cookie!  And then you come to those moments in life when you want a cookie but you're tired of all the same cookie recipes you've been making time and time again.  You need a change, but not too much of a change.  So I introduce my new found love: a Pazookie!  I had never heard of a Pazookie but honestly it has changed my life.  I've made this recipe twice in the same week and will probably make it again later this week.  You can eat them by themselves (that's how my kid's prefer them) but oh my... they are delicious with a scoop of ice-cream on top when they are warm right out of the oven or even microwaved for a bit when you eat what's leftover (if you have any leftovers!).

I love these because they are soooooo delicious, and fun, and fast, and still taste like a cookie, and are a little change up from the every-day chocolate chip cookie.  I've halved the recipe before and they still turn out perfect (making about 10 Pazookie's).  My husband is a huge cookie batter lover.  Ever since my first pregnancy I haven't been able to get myself to eat raw dough, but Colby said this dough was deeeeeeelicious.  Even my boys were sneaking spoonfuls behind my back.

Now a little note... I tried making these as normal cookies and they spread out more than my liking so take my advice and keep them as a Pazookie!  Always!  And forever!  In your life!


See how they each have a little indent in the middle?  That's meant for a scoop of vanilla ice-cream!


Pazookie Cookie Cups
Yield: About 20 Cookie cups

Ingredients
2 1/4 cups all purpose flour
1 teaspoon baking soda
1 teaspoon salt
3/4 cup granulated sugar
3/4 cup brown sugar, packed
1 cup butter (2 sticks), at room temperature
2 teaspoons vanilla extract
2 eggs
1-2 cups chocolate chips (I've always just done 1)

Directions
Preheat oven to 350 degrees and coat muffin tins with non-stick cooking spray.  Apply liberally because no one wants their Pazookie's sticking to the pan!

In a medium-size bowl combine the flour, baking soda, salt and granulated sugar.  In a large bowl or the bowl of a standing mixer, beat the brown sugar, butter, vanilla and eggs.  Slowly add the dry ingredients to the butter mixture.  Beat for about 2 minutes until it's creamy.  Once combined and creamy stir in chocolate chips.

Put a spoonful of dough into each muffin tin.  You'll want to fill them 1/2-3/4 of the way full.  The Pazookie's will rise.  Bake for 11-13 minutes or until they are golden brown on top and a toothpick inserted into the center comes out clean.  Let them cool for about 3 minutes in the tin, then using another toothpick go around each Pazookie to separate it from the tin and remove them to a cooling rack.  Serve warm with a scoop of vanilla ice-cream.  

Source: www.smartschoolhouse.com    


Friday, March 4, 2016

Chicken Tortilla Soup


While I was in college a friend of mine gave me this recipe.  Goes to show that this recipe has too, passed the test of time.  It continues to be one of Colby's favorite dinners.  When I ask him what I should put on the menu for the next week or two this soup is always requested.  Winter time or Summer time, it doesn't seem to matter.  It's just that good.  


Chicken Tortilla Soup
Yield: 6 servings

Ingredients
2 tablespoons olive oil
1 onion (medium)
4 garlic cloves, minced
1 can black beans (drained and rinsed)
1 can diced tomatoes
6 cups chicken stock
2 or 3 raw chicken breasts
salt and pepper to taste
1/2 bunch cilantro, chopped

Toppings (optional): diced avocado, shredded cheese, sour cream, fresh lime juice,
fresh diced tomatoes, toasted tortilla pieces

Directions
Heat olive oil over medium heat.  Add onion and garlic and sauté until tender, about 3-5 minutes.  Add the black beans and diced tomatoes.  Continue cooking for several minutes to get rid of the canned taste (roughly 8-10 minutes).  Add the 6 cups of chicken stock and raw chicken breasts. Continue cooking for 15 minutes until chicken is cooked through.  Remove the chicken breasts, shred them, then add them back to the soup.  Add the chopped cilantro and salt and pepper to taste.  Place the soup in bowls and add any additional toppings you'd like.

Source:  My friend, Allison Knab


Wednesday, March 2, 2016

Salted Carmelitas


I don't know if I can even begin to tell you how much I love these magical, gooey, chocolate, caramel with the perfect hint of salt dessert bars.  If there is dessert served in heaven this has to be one of the options.  I don't think an afternoon goes by where I don't crave these Carmelitas.  Love chocolate?  Yes.  Love caramel?  Yes.  Love to try to eat healthy so when a dessert says it has oatmeal in it, it makes it all the more enticing?  Yes.  And then add that pinch of salt and man... this dessert is maybe just all around perfection.

These Carmelitas whip up in a snap.  They save me on those days when at 3pm I am craving something sweet but don't have a ton of time.  I make it, let it cool during dinner and once all the kids are in bed I bite into it and a smile instantly appears on my face.  Maybe because all the kids are in bed?  Or maybe because these bars are just that wonderful.  


Salted Carmelitas
Yield: About 12 bars

Ingredients
32 caramels, unwrapped (such as Kraft)
1/2 cup heavy cream
1 cup all-purpose flour
1 cup old-fashioned oats
3/4 cup packed light brown sugar
1/2 teaspoon baking soda
1/4 teaspoon table salt
10 tablespoons unsalted butter
1 teaspoon vanilla extract
3/4 cup chocolate chips
Flaky sea salt

1. Preheat the oven to 350 degrees.  Pour cream over caramels in a microwave safe bowl and microwave on high for 30 second intervals until the mixture is melted and smooth.  Stir well after each 30 second interval.  Set aside.

2. In a mixing bowl, whisk together flour, oats, brown sugar, baking soda and 1/4 teaspoon salt.  Set aside.  Place butter in a microwave safe bowl and heat in microwave until melted.  Stir vanilla into butter then pour over dry ingredients and stir well until evenly combined.  Press half of the oat mixture into a well greased 8x8-inch baking pan.  Bake in the preheated oven for 10 minutes.  Remove and sprinkle chocolate chips in an even layer onto the baked oatmeal crust, then pour caramel mixture evenly over the chocolate chips.  Lightly sprinkle sea salt over caramel layer (about 1/2 a teaspoon).  Sprinkle the remaining oatmeal mixture on top and bake for an additional 16 - 20 minutes until lightly golden brown.  Cool completely on a wire rack.  (To speed up the cooling process you can place it in the refrigerator.)  If you cut it before it's completely cooled it will be pretty gooey.  Some think this is wonderful where others may like it a little more set in place.  If that's the case - wait a few hours until it has completely cooled.

Source: adapted slightly from Cooking Classy.  She does 1/2 cup milk chocolate chips and 1/2 cup semi-sweet.  That's a little too much chocolate for me (I find 3/4 does it just right for us).  And I unfortunately don't have milk chocolate chips on hand very often so we go all out with semi-sweet.