I really enjoy learning about new healthy food options and ways to incorporate good nutrition into my recipes. Don't get me wrong, I LOVE a good chocolate dessert and tend to need my chocolate fix daily, but I also know how important it is to have a healthy, balanced diet. If you like learning about new ways to incorporate healthy ingredients into your diet... this is the post for you!
Kefir: a fermented milk drink made with Kefir "grains".
Kefir was something completely foreign to me until a few months ago when a friend down the street asked if I'd like any of her kefir grains. "Sure. Why not? I have no idea what it is but sounds healthy and interesting!" Those were probably the exact words going through my head. So I went to her home, she explained why kefir is so good, she showed me how to make it and I was sold! Here I am, months later, still loving making my kefir multiple times a week. I'm hooked! Now, you probably don't have a friend down the street trying to get rid of her kefir grains, but YOU can be that friend! My friend's sister started making her kefir after she ordered her kefir grains on
amazon. You want to purchase the milk kefir, not the water kefir.
So why do I love Kefir?...
1. I love making things at home. It
saves us money and I feel like it's healthier. Making your own kefir takes less than 5 minutes. Easy-peasy.
2. Kefir has
more probiotics in it than yogurt! Since there are so many probiotics in kefir it can really help with digestive problems. I use to give my children the Culturelle's tablets but sometimes they would back-fire and cause even more issues. (Not to mention they are expensive!) Now I just add kefir into their smoothies and call me crazy, but it seems like they don't complain about tummy issues as much.
3. Kefir has a lot of
antibacterial properties. It also helps
restore the balance of friendly bacteria in your intestines. I've never been a "sickly" person - I think the last time I threw up (sorry, I tried and tried to think of a more pleasant way to put that and I just couldn't) was in Elementary or Middle School. So to begin with, I know I've been blessed with good health,
but I really feel like ever since I've been taking this - I just feel better inside. All of my kids have been sick at least once in the last 4 months, I think even Colby has, but I haven't. I don't say that to brag. I say that just to point out that I drink this stuff at least 4 times a week and I'm staying healthy and feeling great (besides the exhaustion, but that never goes away when you're a mom, right?)
I use this in my smoothies that I make almost every morning and if you make our family's
favorite pancake recipe, I replace buttermilk or the plain greek yogurt, with kefir! You can use kefir instead of buttermilk in any recipe that calls for buttermilk. You can also add it to granola or put it on your cereal.
Let me explain... kefir is fermented milk. There is a lot of yeast in the kefir grains, not bad yeast, good yeast that your body needs. But because of this it has a "ferment-y" smell to it. This is normal. The longer you let it sit in your fridge after you make it the more of a "ferment-y" smell it will get. Because of this I can't drink this plain or pour it on my granola or my yogurt. I just add it as a health-booster to my recipes and
I love it.
There was one time when I was storing my kefir grains in the fridge because I had too much kefir I needed to use and I accidentally grabbed the grains instead of the kefir when making my pancakes. I noticed as we were eating our pancakes that we had little slimy strands in our pancake bites. The texture definitely grossed me out and I texted my friend right away to make sure we weren't all going to start throwing up and end up in the hospital (I'm a worrier, what can I say?) and she said, "eating the actual kefir grains is SO GOOD for you." Okay - thank goodness. Made me nervous. But these little babies are durable, multiply faster than rabbits and can I say it again - good for you!
One more thing then I'll get to the "How-To" portion... Kefir grains
WILL MULTIPLY. You will need to divide your kefir grains every 5 or so times you make kefir. You probably always want to keep about a half-dollar size amount. All the rest you can either pass on to a friend or sadly throw down the drain. The more kefir grains you have the faster your milk will ferment and turn into kefir. I only like to make my kefir about once every 12 hours so keeping the half-dollar size amount seems to be perfect.
Homemade Kefir {A How-To Recipe}
Yield: Between 1-2 cups of Kefir
Ingredients
Kefir grains
1-2 cups milk (Skim milk produces a thinner kefir. The thicker the milk, the thicker the end result.)
Directions
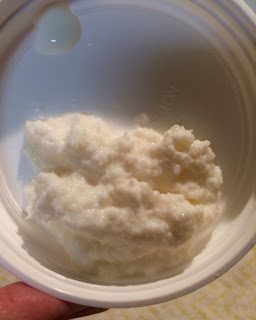
1. Start with your
kefir grains. (Mine looks slimy-er because I just pulled it out of my previous kefir. If you're starting with fresh grains the grains will look more separated and "cleaner".)
2. Put it in your mason jar.
3. Fill it up with 1-2 cups of milk. The more milk you have the longer the grains will take to ferment the milk and turn it into kefir. Put a cloth on the top (you want it to be able to breath but you don't want anything to get inside of it) and leave it on your counter to start kefir-izing.
6 hours later. You can see it changing on the top. It begins to seperate into curds and whey.

This was 14 hours later. The warmer the room and the less milk you have, the faster it will produce. So if your kitchen is cold or you pour a lot of milk or don't have a ton of grains this may take up to 24 hours to get it to the consistency you like. I like it just like this - with the whey on the bottom and the curds on the top. There have been times when the whey has taken up almost half of the jar. That just produces a really thick kefir - which is very much like yogurt and I love it. The more whey = the thicker your kefir.
4. Get your small strainer and clean mason jar.
5. Mix the curds and whey together to combine it all back together. Pour a little bit at a time into the strainer and start straining the kefir through while leaving the grains in the strainer. Repeat until it's all strained through.
You will be left with just the grains in your strainer.
And wah-lah! You have your finished product. Kefir!
6. Now put your grains back into the same jar you had them in on your counter and start the process all over again. Your jar will have some residue on the bottom and sides. This is totally fine. I re-use the same jar for about one week until I pull out a fresh jar. The residue is good leftover yeast. I took this batch of grains and dumped about 1/3 down the drain. See... it multiplies like crazy.
Now... if you ever want to pause your kefir making because you can't keep up with it (this happens to me every week!), you can! Put your grains into a clean mason jar and fill it up with milk until it's just covered. Screw a lid on top and leave it in your fridge until you're ready to start the process up again. This slows the good bacteria production waaaaaaay down. When you're ready to start again get your strainer, pour the grains into your strainer over your kitchen sink and wash your grains a couple of times with
milk.
Do not wash your grains with water. This will strip them of all their good nutrients. Then put them into a clean jar, add the milk, cover with a cloth, sit on your counter, strain, separate the kefir and the grains, and repeat over and over again.
FYI:
There have even been times when I've been in a rush and haven't be able to take care of my kefir when it's needed me so I've just stuck it like this:
in the fridge. Then when I get home or done with whatever I'm doing I pull it out and continue with the process.
Kefir is amazing because it's so resiliant. You can push it down in the strainer, mix it around, pull it in and out of the fridge, etc. and it just. keeps. growing./giving.
I hope you've liked this little tutorial! I've loved sharing this information with you. Making this really makes me happy so I'm happy that I've shared it with you and I hope sometime in your near future it makes you happy, too! That's a lot of happiness going on.
Kefir source: my friend, Kimberlee Lee.


