Monday, May 30, 2016

Flag Pull-Apart Cake

Happy Memorial Day!  This post is to thank all of our service men and women who have sacrificed their time, families, jobs, hobbies, and ultimately their lives for us.  For the freedom we so much enjoy and I'm afraid take for granted most of the time.  I will forever be grateful for these men and women who have done more than we will ever know for people they don't even know and will never even meet.  From my family to yours - Thank you.


And for those of you who have lost a family member or a friend, my heart goes out to you and many times my prayers include you.  I am thinking about you today and I want you to know that those lives that were lost - I will always be so grateful for what they did for me and for my family.  Thank you.


Flag Pull-Apart Cake
Yield: 24 servings

Ingredients
1 box cake mix and all needed ingredients listed on the box
2 containers of vanilla frosting
food coloring
sprinkles

Directions
Make the cake according to the box.  Allow to cool completely before icing and adding the sprinkles.

Friday, May 27, 2016

Pineapple Banana Bread


I am so excited that summer-time is just around the corner.  Maybe I've mentioned that in almost every post the last few weeks?  Just shows that I really am excited.  I love the sunshine and the summer smells and watermelon season and all the yummy food that summer-time brings.  I also can't wait for this upcoming three-day Memorial Day weekend.  No Monday morning crazy rush out the door.  Just hanging out a home, packing a picnic and BBQ-ing at a nearby park with our family and friends.  And bringing along yummy food to share with good company, of course!

I love this Pineapple Banana bread because it is banana bread (which we love) but with a lighter twist to it.  The taste of pineapple summers this bread right up and really makes you feel like you need to go outside and play!  (At least that's what I tell my kids.)  It's a bread you can eat as a snack, as a dessert, or along with your breakfast!  The glaze is completely optional, but that pineapple taste in that sugary topping really is very wonderful.  And don't you love the little poppy-seeds?  Such a fun and light summer-time bread.


Pineapple Banana Bread
Yield: One loaf

Note: You can easily use canned pineapple in this recipe.  I had pineapple in my fridge that was on the verge of going bad so I pulsed it in my food processor and used that instead of canned.  It produced the perfect amount of liquid I needed (just a few tablespoons).  This recipe is a PERFECT way to use up almost too-ripe pineapple. 

*You can also add greased parchment paper with long overhanging ends to your loaf pan to make it easier to get the bread out when you're done.  Normally my bread pops right out of my favorite loaf pans, but this bread for some reason had a little harder of a time.  Next time I will for sure use greased parchment paper. 

Ingredients
Bread
1/2 cup (1 stick) unsalted better, room temperature
1 cup sugar
2 large eggs
1/2 teaspoon almond extract
1 tablespoon poppy seeds (optional, but so fun)
1 ripe banana, mashed
1/2 cup crushed pineapple, drained (reserve the juice!)
2 cups all purpose flour, unbleached
1 teaspoon baking powder
1/2 teaspoon baking soda
1/2 teaspoon salt
Glaze
1 cup confectioner's sugar
reserved pineapple juice (about 2-3 tablespoons)

Directions
Preheat oven to 350 degrees.  *Grease a standard size loaf pan and set aside.  

Cream the butter and sugar in a large bowl.  Beat in the eggs, one at a time and then the extract and poppy seeds.  Blend in the drained pineapple and the mashed banana.

Sift in the flour, baking powder, soda and salt.  Stir with a wooden spoon or large spatula until everything is just combined.

Spread the batter evenly into the pan and shake it around a few times to release any air bubbles.  Bake for about 65 minutes in preheated oven, until golden brown and a toothpick inserted in the center comes out clean.  Cool on a cooling rack before adding the glaze.

To make the glaze:
Mix the confectioner's sugar with two tablespoons of the reserved pineapple juice.  Add more juice as needed to create the glaze consistency you like.

Recipe Source:  modified slightly from theviewfromthegreatisland.com


Wednesday, May 25, 2016

Homemade Kefir {A How-To Tutorial}

I really enjoy learning about new healthy food options and ways to incorporate good nutrition into my recipes.  Don't get me wrong, I LOVE a good chocolate dessert and tend to need my chocolate fix daily, but I also know how important it is to have a healthy, balanced diet.  If you like learning about new ways to incorporate healthy ingredients into your diet... this is the post for you!

Kefir: a fermented milk drink made with Kefir "grains".

Kefir was something completely foreign to me until a few months ago when a friend down the street asked if I'd like any of her kefir grains.  "Sure.  Why not?  I have no idea what it is but sounds healthy and interesting!"  Those were probably the exact words going through my head.  So I went to her home, she explained why kefir is so good, she showed me how to make it and I was sold!  Here I am, months later, still loving making my kefir multiple times a week.  I'm hooked!  Now, you probably don't have a friend down the street trying to get rid of her kefir grains, but YOU can be that friend!  My friend's sister started making her kefir after she ordered her kefir grains on amazon.  You want to purchase the milk kefir, not the water kefir.

So why do I love Kefir?...
1. I love making things at home.  It saves us money and I feel like it's healthier.  Making your own kefir takes less than 5 minutes.  Easy-peasy.

2. Kefir has more probiotics in it than yogurt!  Since there are so many probiotics in kefir it can really help with digestive problems.  I use to give my children the Culturelle's tablets but sometimes they would back-fire and cause even more issues.  (Not to mention they are expensive!)  Now I just add kefir into their smoothies and call me crazy, but it seems like they don't complain about tummy issues as much.

3. Kefir has a lot of antibacterial properties. It also helps restore the balance of friendly bacteria in your intestines.  I've never been a "sickly" person - I think the last time I threw up (sorry, I tried and tried to think of a more pleasant way to put that and I just couldn't) was in Elementary or Middle School.  So to begin with, I know I've been blessed with good health, but I really feel like ever since I've been taking this - I just feel better inside.  All of my kids have been sick at least once in the last 4 months, I think even Colby has, but I haven't.  I don't say that to brag.  I say that just to point out that I drink this stuff at least 4 times a week and I'm staying healthy and feeling great (besides the exhaustion, but that never goes away when you're a mom, right?)

I use this in my smoothies that I make almost every morning and if you make our family's favorite pancake recipe, I replace buttermilk or the plain greek yogurt, with kefir!  You can use kefir instead of buttermilk in any recipe that calls for buttermilk.  You can also add it to granola or put it on your cereal.

Let me explain... kefir is fermented milk.  There is a lot of yeast in the kefir grains, not bad yeast, good yeast that your body needs.  But because of this it has a "ferment-y" smell to it.  This is normal.  The longer you let it sit in your fridge after you make it the more of a "ferment-y" smell it will get.  Because of this I can't drink this plain or pour it on my granola or my yogurt.  I just add it as a health-booster to my recipes and I love it.

There was one time when I was storing my kefir grains in the fridge because I had too much kefir I needed to use and I accidentally grabbed the grains instead of the kefir when making my pancakes.  I noticed as we were eating our pancakes that we had little slimy strands in our pancake bites.  The texture definitely grossed me out and I texted my friend right away to make sure we weren't all going to start throwing up and end up in the hospital (I'm a worrier, what can I say?) and she said, "eating the actual kefir grains is SO GOOD for you."  Okay - thank goodness.  Made me nervous.  But these little babies are durable, multiply faster than rabbits and can I say it again - good for you!

One more thing then I'll get to the "How-To" portion... Kefir grains WILL MULTIPLY.  You will need to divide your kefir grains every 5 or so times you make kefir.  You probably always want to keep about a half-dollar size amount.  All the rest you can either pass on to a friend or sadly throw down the drain.  The more kefir grains you have the faster your milk will ferment and turn into kefir.  I only like to make my kefir about once every 12 hours so keeping the half-dollar size amount seems to be perfect.

Homemade Kefir {A How-To Recipe}
Yield: Between 1-2 cups of Kefir

Ingredients
Kefir grains
1-2 cups milk (Skim milk produces a thinner kefir.  The thicker the milk, the thicker the end result.)

Directions
1. Start with your kefir grains. (Mine looks slimy-er because I just pulled it out of my previous kefir.  If you're starting with fresh grains the grains will look more separated and "cleaner".)


2. Put it in your mason jar.


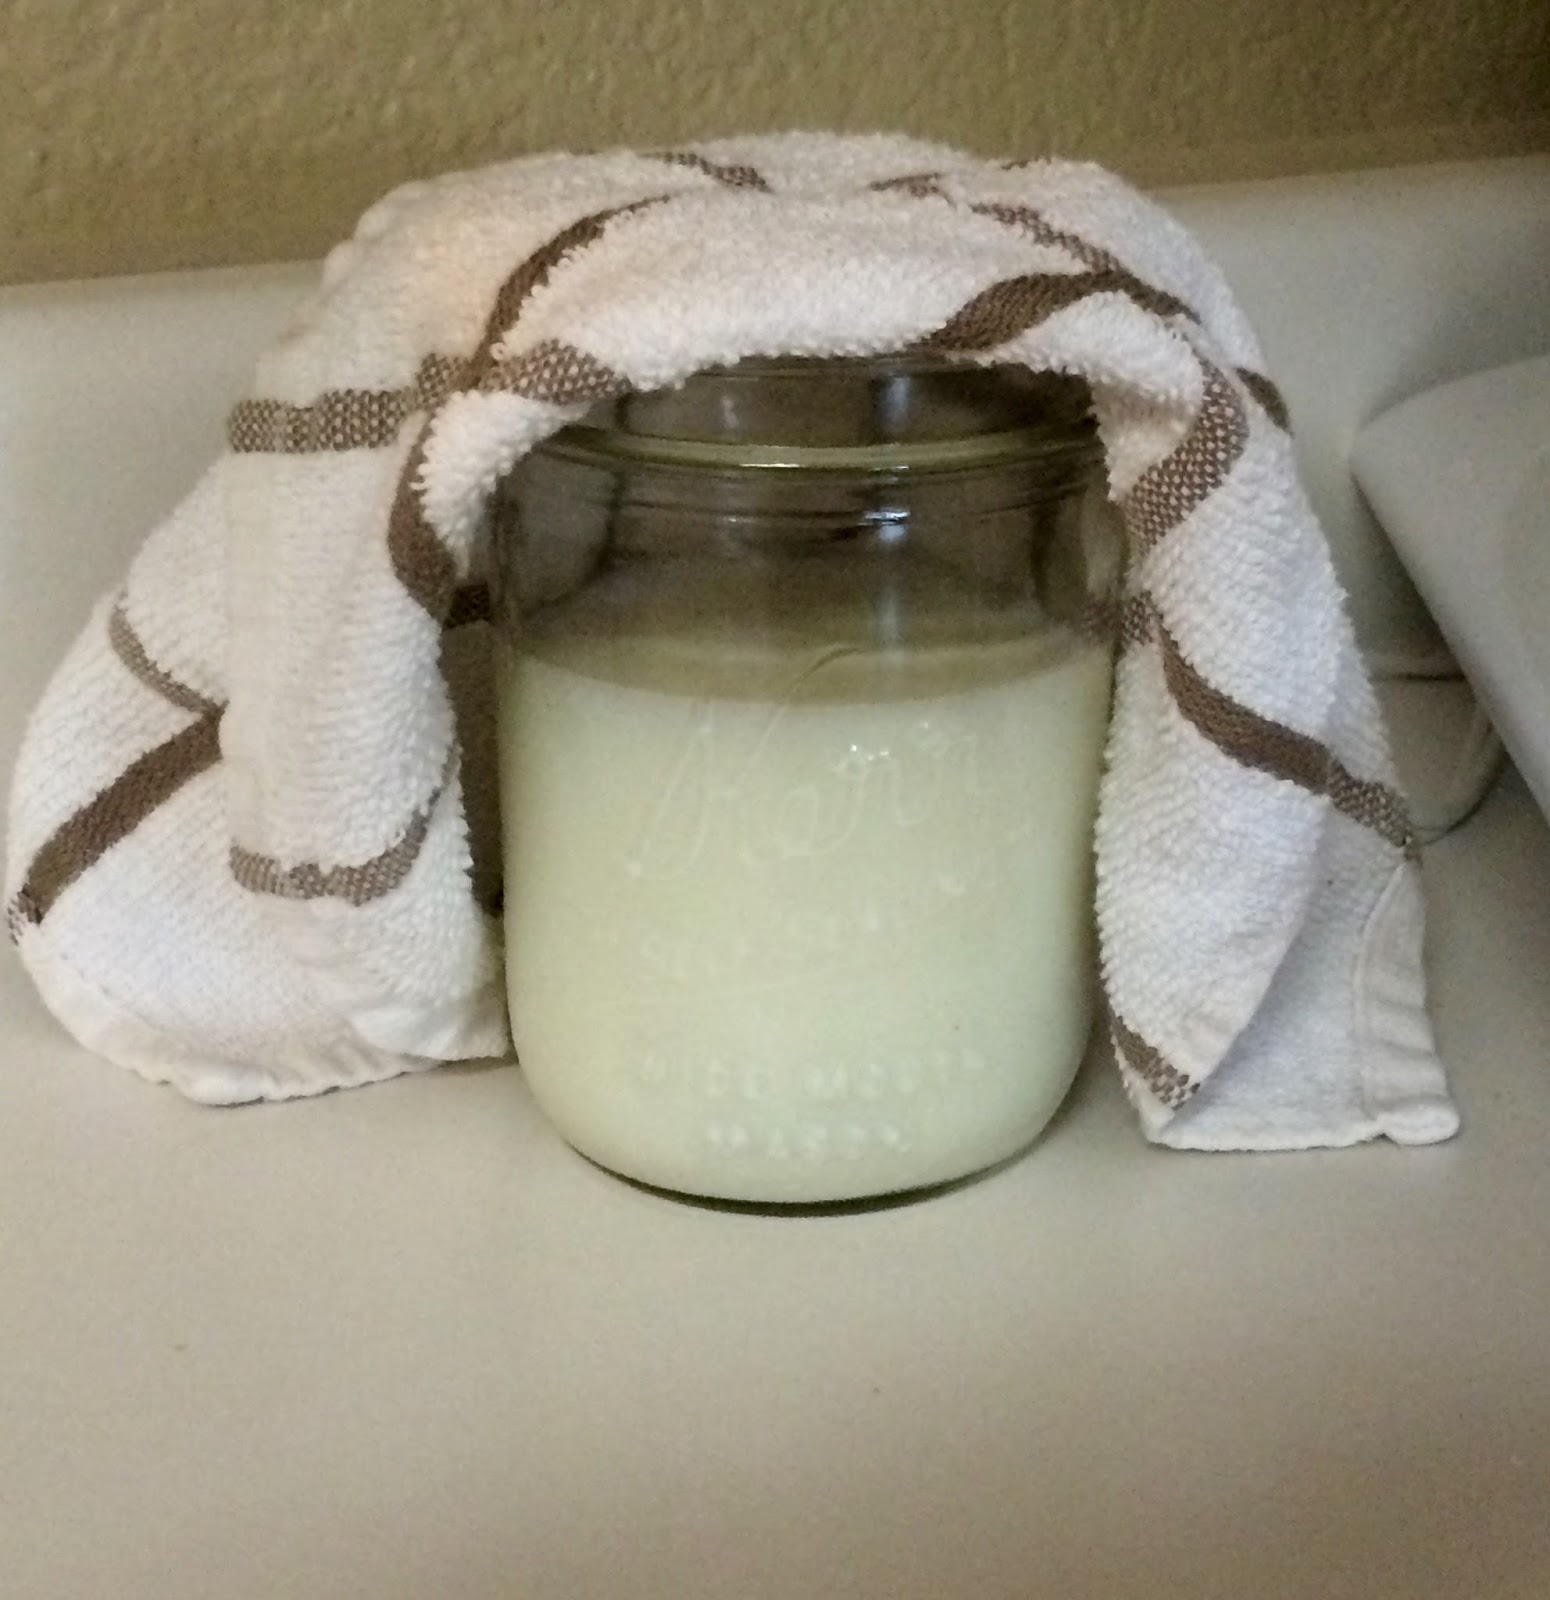
3. Fill it up with 1-2 cups of milk. The more milk you have the longer the grains will take to ferment the milk and turn it into kefir.  Put a cloth on the top (you want it to be able to breath but you don't want anything to get inside of it) and leave it on your counter to start kefir-izing.


6 hours later.  You can see it changing on the top.  It begins to seperate into curds and whey.


This was 14 hours later.  The warmer the room and the less milk you have, the faster it will produce.  So if your kitchen is cold or you pour a lot of milk or don't have a ton of grains this may take up to 24 hours to get it to the consistency you like.  I like it just like this - with the whey on the bottom and the curds on the top.  There have been times when the whey has taken up almost half of the jar.  That just produces a really thick kefir - which is very much like yogurt and I love it.  The more whey = the thicker your kefir. 


4. Get your small strainer and clean mason jar.


5. Mix the curds and whey together to combine it all back together.  Pour a little bit at a time into the strainer and start straining the kefir through while leaving the grains in the strainer.  Repeat until it's all strained through.


You will be left with just the grains in your strainer.


And wah-lah!  You have your finished product.  Kefir!


6. Now put your grains back into the same jar you had them in on your counter and start the process all over again.  Your jar will have some residue on the bottom and sides.  This is totally fine.  I re-use the same jar for about one week until I pull out a fresh jar.  The residue is good leftover yeast.  I took this batch of grains and dumped about 1/3 down the drain.  See... it multiplies like crazy.  


Now... if you ever want to pause your kefir making because you can't keep up with it (this happens to me every week!), you can!  Put your grains into a clean mason jar and fill it up with milk until it's just covered.  Screw a lid on top and leave it in your fridge until you're ready to start the process up again.  This slows the good bacteria production waaaaaaay down.  When you're ready to start again get your strainer, pour the grains into your strainer over your kitchen sink and wash your grains a couple of times with milk.  Do not wash your grains with water.  This will strip them of all their good nutrients.  Then put them into a clean jar, add the milk, cover with a cloth, sit on your counter, strain, separate the kefir and the grains, and repeat over and over again.

FYI:
There have even been times when I've been in a rush and haven't be able to take care of my kefir when it's needed me so I've just stuck it like this:


in the fridge.  Then when I get home or done with whatever I'm doing I pull it out and continue with the process.

Kefir is amazing because it's so resiliant.  You can push it down in the strainer, mix it around, pull it in and out of the fridge, etc. and it just. keeps. growing./giving.

I hope you've liked this little tutorial!  I've loved sharing this information with you.  Making this really makes me happy so I'm happy that I've shared it with you and I hope sometime in your near future it makes you happy, too!  That's a lot of happiness going on.

Kefir source: my friend, Kimberlee Lee.


Monday, May 23, 2016

Almond Poppy Seed Chicken Salad Sandwiches


Summer is almost here and I am getting really excited to pack picnic lunches and/or have dinners outside with the fam.  When we lived in GA it was always waaaaaaaay to humid to even think about taking a picnic outside, but I'm hoping Texas will be a little more understanding to a mom who just wants to take her kids on a fun picnic lunch every once in awhile once school is out.

I know some people are a little skeptical when it comes to any kind of salad sandwich either because of the texture or the too much mayonnaise-y taste.  I saw this recipe and it looked soooooo good to me, but Colby falls under those "too much mayonnaise-y taste" kind of people so I was a little hesitant to make it.  BUT... people need variety, right?  And this recipe just kept creeping into my little mind so I couldn't push it away anymore and I actually welcomed it right in with a very warm and happy smile of "yes, please."  So I made it!

I waited as my family took their first bites, a little nervous what reactions would be and the response, "Wow, this really isn't that bad."  What did my ears hear? = "PRINT THIS ONE OFF AND ADD IT TO THE PARK FAMILY RECIPE BOOK!"  Success.  This recipe is the perfect blend of everything included.  Not too much mayonnaise, not too much of anything.  I loved the texture of the toasted almonds with the chicken and celery and grapes.  And even leftovers the next day for lunch weren't too runny.  It was still just as perfect.  Maybe even better from day 1.

So - if you're looking for a recipe to take on your family picnic this Memorial Day, or one this summer when you're heading off to the park - I highly recommend these delightful almond poppy seed chicken salad sandwiches.


Almond Poppy Seed Chicken Salad Sandwiches
Yield: 6 sandwiches

Note: I like to put a piece of lettuce under the salad on the sandwiches because it helps to keep the bread from turning soggy.  The green also adds a pop that looks great.  Not to mention it tastes perfect right along with the salad.

Ingredients
Dressing
2/3 cup plain Greek yogurt
1/4 cup mayonnaise
2 tablespoons honey
1 tablespoon red wine vinegar
1 tablespoon poppy seeds
1 teaspoon dijon mustard
3/4 teaspoon salt
Chicken Salad
1 pound bonesless skinless chicken breasts, cooked, chilled and diced into small cubes
1 1/3 cups red grapes, halved
3/4 cup celery, diced small
1/2 cup sliced almonds, toasted
1/3 cup chopped green onions (green portion only)

Directions
For the chicken:
If you don't already have leftover chicken this is how I made the chicken for this salad and it turned out perfect, and easy to clean up.  I lined a rimmed baking sheet with aluminum foil then lightly sprayed it with cooking spray.  I put the chicken on the foil and pounded it down to try to make it all the same thickness (not necessary but I liked doing it).  Then I brushed olive oil over both sides of all breasts and seasoned with salt and pepper.  I baked it in a preheated 425 degree oven for 25 minutes.  It will take anywhere form 15-25 minutes depending on the thickness of the chicken.  You just want the internal temperature at the thickest part of the chicken to reach 165 degrees.  Once it was cooked I chilled it in the refrigerator until I needed to dice it up and add it to the salad.

For the dressing:
Whisk
 all of the ingredients together in a medium bowl and set aside.

For the salad:
Add all the salad ingredients together in a large mixing or salad bowl.  Add the dressing and toss evenly to coat.  Either serve immediately on croissants or store in the refrigerator for 1-2 hours until ready to serve.

Recipe Source: adapted slightly from cookingclassy.com.

Sunday, May 22, 2016

"Take 5" {Even better than the candy bar}

This past weekend I attended Christy Wright's Business Boutique and let me tell you - It. Was. Amazing.  I would be as bold as to call it "Life Changing".  It was a two day conference about "equipping women to make money doing what they love."  We love Dave Ramsey and agree with and follow everything he teaches.  Christy Wright is one of his personalities and she was great!

This was a two-day conference and close enough to my home that I could drive there in the mornings and be back at dinner-time.  Two days with no kids!  WOW!  Colby was so great and took care of everything at home so I could go and he was actually the one who really encouraged me to purchase the ticket.  On the second day though, during the two-hour lunch break I really started missing my kids.  What were they doing?  Was Landon happy when Colby put him down for his nap?  Were they playing outside or watching tv?  Was Ryan's allergies bothering him?  Did everyone have one fruit and one vegetable with their lunch?  Were there hands clean?  As you can see... the list went on and on.  So naturally I turned to my phone, opened my photo app and went to start looking through photos of my children, but instead of clicking the "Photos" option for some I was drawn to the "Selfies" option.

Now I really don't like seeing pictures of myself.  I don't like being on camera.  I don't like all eyes on me.  So I really really REALLY don't love selfies.  But I clicked on it for some reason and instantaneously my heart got so full.  As I looked at these pictures the phrase that kept coming into my head was, "You are so blessed, Heather."  I looked at all of these memories before me and felt overwhelmed with all of the amazing people who have been put into my life.  My children, Colby, the family I was born into and my friends.  Each picture brought back a memory and even the ones with sick kids brought a smile to my face.  I could see and feel Heavenly Father's hand in each one of those pictures and felt immense gratitude.


So my invitation to you is... "Take 5" minutes today.  Look at the "selfies" on your phone and remember all of the good times you have had in your life.  Look and see the beautiful people who have been placed in your life just. for. you.  Look and see how much your Father in Heaven cares about and loves you.  It will be the best 5 minutes of your day and will give you the drive and motivation to continue pressing forward.  One foot at a time.  Being the person these people need YOU to be, because just as much as you need them in your life; they need you.


These five minutes will be even more "delicious" than the "Take 5" candy bar, and that's a lot coming from me, because that candy bar is one of my favorites!


Wednesday, May 18, 2016

Homemade Taco Seasoning


I get really excited when I realize I can make things like taco seasoning and chicken stock and salad dressings at home.  Like really excited.  After posting my Panera chocolate chip cookie recipe a few days ago, I called Colby at work all giddy.  I don't think he understands how creating something from scratch that is as delicious as those cookies can make me so happy, but he's a good sport and I can tell he's smiling on the other side of the phone.  This taco seasoning isn't as melt-in-your-mouth-yummy as those chocolate chip cookies, but it still gets me just as happy knowing I'm saving money and giving my family healthier ingredients than if I would buy the seasoning packets at the store.  


Plus, don't you hate it when you're already in the middle of making dinner and realize you don't have a very important, necessary ingredient, like taco seasoning for tacos?!  Ahhh.  Yes, I'm speaking from experience.  Well, worry no more because I bet you have all of these ingredients already in your pantry.  No more middle of the meal-prep freak-out moments.  Except for when your kids are clinging to your legs and running around the house killing each other.  Then freak-out moments are totally understandable.  Don't they understand the making dinner process is really you keeping them alive by feeding them?  Don't they get that?  So can't they just sit quietly and play together like they love each other?


Homemade Taco Seasoning

Note: I like to quadruple this recipe so I have some readily available in my cabinet.

Ingredients
1 tablespoon chili powder
1/4 teaspoon garlic powder
1/4 teaspoon onion powder
1/8 teaspoon crushed red pepper flakes
1/4 teaspoon dried oregano
1/2 teaspoon paprika
1 1/2 teaspoons ground cumin
1 teaspoon salt
1/2 teaspoon black pepper

Directions
Combine all ingredients in a small bowl and blend well.  Use immediately or store in an airtight container.

To use:
Brown 1 pound of ground meat in a medium skillet over medium-high heat; drain excess grease.  Add 1/2 cup of water and 1 1/2 tablespoons of taco seasoning mix.  Reduce heat to low-medium and simmer for 10 minutes, stirring occasionally.

Recipe Source:  adapted slightly from allrecipes.com


Monday, May 16, 2016

Panera Chewy Chocolate Chip Cookies {Copycat}


I've mentioned before that I am more of a brownie/bar kind of gal, but these cookies may have changed that forrrrrreeeeeeverrrrrrr.  When I say Holy Cow I mean Holy Cow.  These cookies are like heaven.  I think they may be the best chocolate chip cookie recipe I've ever made.  Actually I know they are.  They are big.  They are chewy.  They are thick.  They have little morsels of chocolate chips perfectly spread in every bite.  I've never used mini chocolate chips before but I LOVE THEM and I don't know why I've waited this long to use them.  Since these cookies are so thick the mini chips distribute perfectly throughout the cookies and allows the balance between the chocolate and the cookie in each bite to be just right.  You really need to try these.  If not today, soon.  Very soon.  And I'm only saying this because when you find something you love you can't wait to share it with people you care about.  I really think I'm going to be texting all my siblings right now saying they've gotta try these.

I've never bought a cookie at Panera before so I don't know if these really are just like them but I have to tell you that in a matter of 5 days I have made this recipe twice.  And these cookies are large so it wasn't because they were teeny-tiny.  It was because they were so gosh darn good I couldn't stand to not have any in my freezer.

Colby grew up with cookie dough in his freezer.  I've never bought chocolate chip cookie dough at the store before (well, maybe the first year we were married for his birthday), so he hasn't had his chocolate-chip-cookie-dough ready at his fingertips in almost the last 10 years.  Until now.  His face lit up when he opened the freezer door and saw these glorious balls all zipped up in their ziploc bags.

These cookies transfer so well from freezer to oven.  I just love this!  I think I'm going to start doubling this recipe because how great it is to have delicious homemade cookie dough ready at your finger tips just waiting to either be eaten frozen (if you need your cookie-dough craving satisfied) or placed right into the oven and less than 20 minutes later wah-lah: Heaven in a cookie.

Scoop out 1/4 cup at a time.

I place them on a cookie sheet because I like to see them all lined up and ready to go in the bag.


Ready to freezer up.

They. Are. Perfect.

The biggest.

The thickest.

The chewiest.

So much fun to share with friends.


Panera Chewy Chocolate Chip Cookies
Yield: About 24 Large cookies

Note: You don't have to use dark brown sugar.  I've used both and the light brown sugar seems to be a little sweeter, but both turn out wonderfully.  You also don't have to use mini chocolate chips.  I've also made these with normal size, but I have to tell you the truth - the mini chips were just so much better and more fun!

Ingredients
1 cup butter, room temperature
1/2 cup shortening
1 1/2 cups dark brown sugar
1/2 cup granulated sugar
2 large eggs
4 teaspoons vanilla extract
4 1/3 cups al-purpose flour, unbleached
2 tablespoons cornstarch
2 teaspoons baking soda
1 teaspoon salt
1 bag mini semi-sweet chocolate chips

Directions
In a stand mixer, beat butter, shortening and sugars until light and fluffy, about 2-3 minutes.  Add eggs and beat well.  And vanilla and beat well until all is combined.

In a separate bowl whisk together the flour, cornstarch, baking soda and salt.  Gradually add dry ingredients into wet ingredients beating well after each addition until all is well combined.  Add in chocolate chips and stir until evenly distributed.

Scoop out dough using a 1/4 measuring cup.  Then form each measuring cup into a ball (I kind of mind mine a little more square), place on your cookie sheet, and press down a little on the top ever so slightly to flatten.  Continue until all the dough is balled.  I usually end up with about 27 large cookies.  Place each ball of dough in a freezer bag (you can fit between 16-20 balls in a bag) and freeze for 2 hours or up to 3 months.

When you're ready to bake, preheat oven to 350 degrees F and line cookie sheets with parchment paper or silpat liners.  Remove cookie dough from freezer and place on prepared cookie sheets.  Bake for 15-17 minutes.  (Do not thaw cookie dough.  It can go right from the freezer to the oven.  Genius!)  Let cookies cool for 2 minutes before transferring to cooling rack.

Recipe Source: The Pinning Mama


Friday, May 13, 2016

One Sheet Pan Roasted Garlic-Parmesan Chicken Tenders with Green Beans and Fresh Grape Tomatoes


I love a one-pan dinner.  The less pans the better, right?  This chicken dinner is one I love to make and LOVE to eat.  The green beans turn out just perfectly tender yet crisp and the chicken has so much yummy flavor.  Oh I think I could eat this chicken every other night of the week it is that good.  I like that I can either roast the tomatoes or add them at the very end still cool and fresh.  Or do half roasted and half right out of the fridge.  It doesn't take very long to put together - especially when you have your 6 and 7-year-old sons cut the tops off the green beans and slice the tomatoes in half for you!  This is definitely a dinner your kids can help you make - they'll appreciate it more too if they make it with you.  (At least that's what I keep telling myself.)  We love to our favorite homemade dinner rolls with this one-pan dinner.


One Sheet Pan Roasted Garlic-Parmesan Chicken Tenders
with Green Beans and Fresh Grape Tomatoes
Yield: About 4 servings

Ingredients
1 1/4 lbs bonesless skinless chicken tenders (or chicken breasts sliced into strips)
1/2 cup plain bread crumbs
1/2 cup + 2 tablespoons slightly packed, finely grated parmesan cheese
3/4 teaspoon dried basil (or 1 1/2 tablespoons fresh basil)
1/4 teaspoon each dried oregano, thyme and crushed rosemary
Salt and freshly ground black pepper
5 tablespoons olive oil, divided
2 cloves garlic, minced
1 lb fresh green beans, tops trimmed
1 cup grape tomatoes, sliced into halves

Directions
Preheat oven to 400 degrees.  Line a large rimmed baking sheet with parchment paper.

In a shallow dish whisk together bread crumbs, parmesan, basil, oregano, thyme and rosemary and season with salt and pepper to taste.  Add 4 tablespoons olive oil to a separate shallow dish and stir in garlic.

Working with one chicken tender at a time, dip both sides in olive oil then transfer to bread crumb mixture and coat both sides, while pressing crumb mixture onto chicken to adhere.  Transfer to one side of the baking sheet.  Repeat process with remaining chicken tenders placing them in a row along one side of the baking sheet.  Spread remaining bread crumbs over tops of chicken and gently press.

In a large bowl, toss green beans with 1 tablespoon olive oil.  On opposite side of baking pan spread beans to edges and sprinkle with salt and pepper to taste.  Roast in preheated oven 23-25 minutes, tossing green beans once halfway through cooking, until chicken is golden brown and green beans are crisp-tender.  If you want the tomatoes roasted too add them during the last 10 minutes of cooking.  Remove from oven and if you didn't roast the tomatoes, sprinkle them over green beans now.  Serve warm.

Recipe Source: cookingclassy


Wednesday, May 11, 2016

Chocolate Oreo Truffles


If you're needing/craving/wanting a little piece of chocolatey goodness I highly recommend these Chocolate Oreo Truffles.  You can make them as little or large as you'd like.  You can grab one on your way out the door during your busy day to fill that chocolate craving or sit down and enjoy a handful if you need to take a break for a few minutes and indulge in life's deliciousness.  My family and I love these little truffles.  They would probably last about a week in the refrigerator, but I don't really know because they've never lasted longer than three days in our's!


Chocolate Oreo Truffles
Yield: About 24 balls (depending on how large or small you make them)

Note: I don't like to use double-stuffed OREO's because I feel like there's too much cream.  I'm just really going for the chocolate cookie part.  ALSO: If you are wanting to dip the whole ball in chocolate you may need up to 12 oz of semi-sweet chocolate.  Most of the time I just dip them in with a toothpick and don't cover the whole ball so 8 oz. is plenty and even leaves chocolate leftover.

Ingredients
1 (8 oz.) cream cheese, room temperature
36 (1 package) OREO Cookies, finely crushed
8 oz semi-sweet chocolate chips (or baking chocolate)
1 tablespoon shortening

Directions
Line a cookie sheet with parchment paper.  Set aside.

In a bowl, with a handheld mixer, mix the cream cheese and cookie crumbs until well blended.  Shape into balls and place on parchment paper.  Freeze for 10 minutes to allow them to harden a little.

In the meantime place semi-sweet chocolate and shortening in a microwave safe bowl and microwave on high for 30 second intervals, stirring well between each interval.  Do this until all has melted and become smooth.  It usual takes me three intervals.  Remove balls from freezer and dip each ball in the melted chocolate.  You can either drop them in and fish them out with a spoon or put a toothpick in the top and dip them in one at a time if you don't want the whole thing covered in chocolate.  (See note above.)  Place back on the parchment paper and refrigerate 1 hour or until firm.

Store in an airtight container for up to one week.

Recipe Source: adapted slightly from OREO.


Monday, May 9, 2016

Cafe Rio Pulled Sweet Pork Salad


One of the things Colby and I miss most about Utah is Cafe Rio.  This restaurant is one of our top 3 favorites, probably #1.  Whenever we go back to Utah, even if it's for a short two-day trip, it is on our list of things to do.  Their creamy house dressing and portion sizes and everything about it is, well in our book - perfect.  A few years ago my sister, Laurel gave me their Pulled Sweet Pork copycat recipe along with their Cilantro Lime Rice recipe and Creamy House Dressing recipe.  We were sooooooo excited to say the least and I've probably been making it about once every other month ever since then.  It does take a little bit of work because there is a lot that goes into this salad, but it's all really easy and so incredibly worth it.  


Cafe Rio Pulled Sweet Pork
Yield: 6 servings

Note: Recently I've been making this with chicken instead of a pork roast.  We love it just as much, maybe even a little better because the chicken doesn't have as much fat as the pork.  If you decide to use chicken instead of pork put the raw chicken in the crock pot along with the combined coke, sugar and salsa and cook on low for 6 hours.  Then shred and continue with the directions as given below. 

Ingredients
Pulled Sweet Pork
3-4 lbs. pork roast
1 can coke
2 cups brown sugar
1 16 oz. bottle of salsa

Put the roast in the crock pot, fill crock pot 1/2 way up with water.  Cook on high for 5 hours.  Drain off water, cut pork into thirds.  Mix coke, sugar and salsa together, pour on top of pork.  Cook an additional 3 hours on high.  Shred pork with a fork, return to crock pot and leave on low or "keep warm" until ready to serve.

Cilantro Lime Rice
2 tablespoons oil
1 lb. long grain rice (3 cups)
2 limes, juiced
1 bunch of cilantro, chopped
4 cloves garlic, minced

Heat oil in a large pot then add rice, garlic and cilantro.  Saute 3-5 minutes.  Add 4 cups water and lime juice to the pot.  Bring water to boil, reduce heat to low, cover and cook for 20-25 minutes.  Take off heat, fluff with a fork, cover again and keep covered until ready to serve.

Creamy House Dressing
1 buttermilk ranch dressing packet (Hidden Valley Ranch recommended)
1 cup buttermilk
1 cup mayonnaise (DO NOT use low fat or fat free)
1/2 bunch cilantro, chopped
1 clove garlic, minced
1 lime, juiced

Use a food processor or blender to mix all the ingredients well.  Refrigerate at least 1-2 hours before serving.

Other Ingredients
4-6 burrito-sized tortillas
shredded cheddar cheese
1 can black beans
Romaine lettuce, chopped
salsa, optional
sour cream, optional
Tortilla chips, optional

Directions
Put the oven on the "broil" setting.  Place tortilla shells in 9" round cake pans and sprinkle with shredded cheddar cheese.  Place pans in the oven on the top rack until the cheese has melted - this takes just a few minutes.  It'll burn quickly if you don't watch it closely.  Remove from the oven and add rice, pulled pork, black beans, romaine lettuce, creamy dressing, salsa and sour cream.  Cafe Rio adds little strips of tortilla chips on top if you'd like to add those too.


Recipe Source: My sister, Laurel Larsen     


Friday, May 6, 2016

Our Favorite Pizza with our Favorite Tomato Sauce

My kids LOVE pizza.  Don't all kids?  I think it's in a kid's DNA, along with Kraft Macaroni and Cheese.  I think I've made homemade pizza twice a month for the last oh I don't know, 2 to 3 years.  That's a lot of pizza making.  We've gone through a handful of pizza sauces and pizza dough recipes.  Some have been successes and some have received the comment of, "You don't ever have to use this recipe again."  But the recipes I'm sharing with you in this posting our, our favorites!  Colby loves this tomato sauce so much he said I should use it as a spaghetti sauce and in our lasagna.  I think I'll give it a try!  And we all loved this dough.  I especially loved this dough because all I needed to make it was a bowl and my hands!  No electric mixer or mixing bowl required!  High Five!  I love my Bosch and all but sometimes a girl just wants one day's break from having to clean that thing.  And from now on - pizza day will be that one day's break.  


The adult's version with fresh mozzarella chunks (I love fresh mozzarella balls!), basil and grated Parmesan cheese.


The kid's version with freshly shredded mozzarella and nothing else.


Homemade Pizza Dough
Yield: 2 medium pizzas

Ingredients
1 1/2 cups warm water
3 1/2 teaspoons instant yeast
2 teaspoons granulated sugar
1/2 cup extra virgin olive oil, plus more for brushing
1 teaspoon salt
4 cups all-purpose flour, unbleached

Directions
Pour the water into a large bowl and add instant yeast.  Whisk in the sugar, oil and salt.  Gradually add the flour and stir until a sticky dough forms.  I end up stir it with my hands the last little bit.

Spray another large bowl with non-stick cooking spray.  Place the dough inside the bowl and cover with lightly greased plastic wrap.  Allow to rise until doubled in size, about 1 hour.

Preheat oven to 450 degrees.  Place a baking stone in the oven and allow it to heat up for about 30 minutes.  (There have been times when I haven't had 30 minutes to let the stone warm up and the pizza still turned out fine.)  Turn dough onto a little greased surface and gently knead for 1 minute.  Form into a ball and let it rest, covered for 10 minutes.

Place dough onto lightly greased parchment paper and starting in the center and working outwards, use your fingertips to press the dough into a 1/2-inch thick circle.  You can make the crust a little fatter if you'd like a lip.  Transfer parchment paper with the flattened dough to a pizza peel or baking sheet.  Poke holes in the dough with a fork all around the circle then brush a little olive oil on top.  Add your sauce and any toppings you would like.  Slide the parchment paper with the dough off the peel and onto the baking stone in the oven.  Bake for 10 minutes, until the crust and cheese are golden.


Favorite Tomato Sauce
Yield: 3 cups - About 4 medium pizzas

2 tablespoons extra-virgin olive oil
3 cloves garlic, minced
1 can (28 oz) crushed tomatoes
2 tablespoons tomato paste
2 tablespoons red wine vinegar
1 teaspoon dried basil (1 tablespoon fresh basil, chopped)
1 teaspoon dried oregano
1/2 teaspoon salt
1/4 teaspoon red pepper flakes

In a large skillet, heat the oil over medium-high heat.  Add the garlic and cook for 30 seconds or until it turns lightly golden and fragrant.  Add the tomatoes, tomato paste, vinegar, basil, oregano, salt and pepper flakes.  Stir to combine.  Bring to a boil, then reduce the heat to low and simmer, uncovered for 20 minutes, stirring occasionally.  The sauce should thicken slightly.

Allow sauce to cool before placing any leftovers in a tupperware and storing in the refrigerator or placing in a freezer bag and freezing.  Any leftovers in the refrigerator should stay good for up to one week.  So if you make pizza every Friday (I know lots of people do Pizza Friday's) you shouldn't have to freeze it.


Recipe Source:
Tomato Sauce: My favorite Runner's Cookbook.
Pizza Dough: adapted from bellyfull.net